To be able to script your SSH file transfers and not be prompted for a password, you will need to use a keypair to authenticate yourself to the OUAC server.
Public Key Authentication
You can generate a keypair using the command ssh-keygen on Unix or using PuTTYgen on Windows.
Running PuTTYgen on Windows
Unlike psftp and pscp, PuTTYgen is a graphical program.
Run it from the Start Menu: Start → All Programs → PuTTY → PuTTYgen.
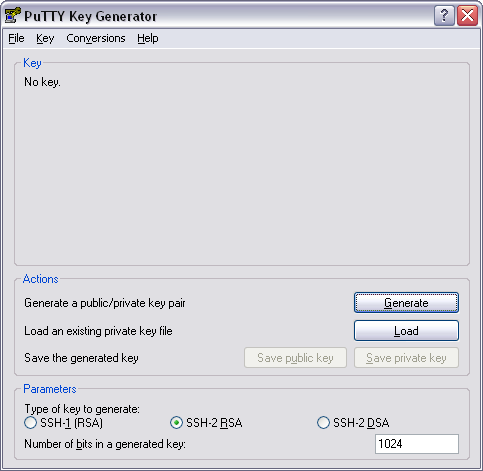
Generate a keypair:
- Review the Parameters section and make sure you are generating a keypair of type “SSH-2 RSA” and length “2048” or greater.

- Click “Generate”. You will be prompted to randomly move the mouse around. This helps to generate a secure key.

- Once a keypair is been generated, save each part separately.
- Secure the private portion of your keypair with a passphrase. This should be long and can contain spaces. The longer and more random the passphrase, the more secure your authentication will be.
- Click “Save private key” and save your private key somewhere that only trusted users can read it.This step is critical. Anyone who obtains a copy of your private key and your passphrase will be able to log in to your account. It is highly recommended to use a passphrase on your private key!
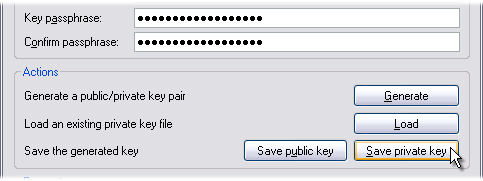
- Select “Save public key”. It is a good idea to save a copy of your public key with your private key in case you need it again.
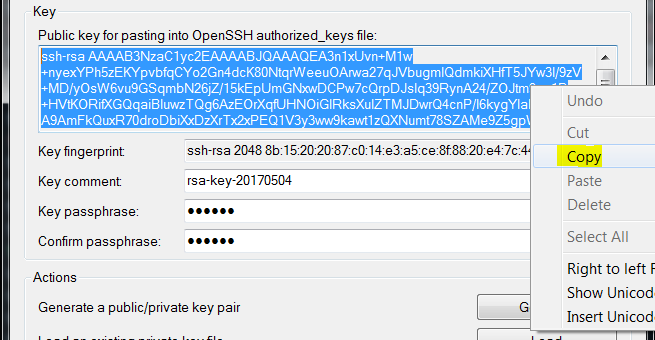
- Copy your public key to our server. Select the entire key with your mouse and copy it.
- Connect to the SSH server using PuTTY and your password and paste your public key into your ~/.ssh/authorized_keys file.
First, try to create your ~/.ssh/ directory. If it already exists you will get an error. This is OK.
From ssh.ouac.on.ca:
- Input $ mkdir ~/.ssh
- mkdir: cannot create directory ‘/home-directory/.ssh’: File exists
- Now, edit your ~/.ssh/authorized_keys file:
From ssh.ouac.on.ca:
- Input $ nano ~/.ssh/authorized_keys
- This will open a simple file editor called nano.
- Make sure that you are on a new line and right-click the PuTTY window. This will paste your public key into the file.
- Now save the file with Control-O, then press “Enter”.
- Exit nano with Control-X.
Make sure that your .ssh directory and authorized_keys file have the appropriate permissions:
From ssh.ouac.on.ca:
- Input $ chmod 700 ~/.ssh/
- $ chmod 600 ~/.ssh/*
To take advantage of your new keypair for authentication, use the -i flag to psftp or pscp, from your local computer:
- Input C:\>psftp -P 52222 username@ssh.ouac.on.ca -i C:\path\to\private\key.ppk
- Use”username”.
- Passphrase for key “rsa-key-20170504”:
Using Pageant to Handle Your Passphrases
For non-interactive SSH, activate PuTTY’s SSH Agent program called Pageant to handle your passphrases.
Using Pageant constitutes a security risk. The severity of this risk depends on the security of the computer on which it resides. It is up to you to weigh the security/convenience trade-off and decide whether this is the correct option.
- Run Pageant from the Start Menu. This will put a small icon in your system tray.
- Double-click this icon to bring up the Pageant window.
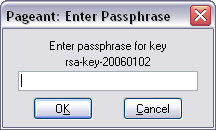
- Now, add your private key to Pageant with “Add Key”.
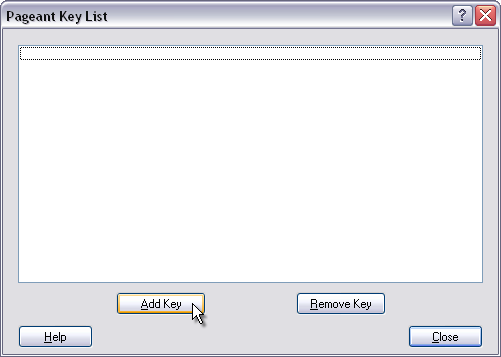
You will be prompted for your passphrase when you add the key, but not again as long as Pageant is running. If you close the Pageant window, it will continue running in the system tray.
Now try using the key authentication method from above, from your local computer:
- Input C:\>psftp -P 52222 username@ssh.ouac.on.ca -i Desktop\Temp\temp.ppk
- Use “username”.
- Remote working directory is /home/username
- psftp>
Running ssh-keygen on Unix
From your local computer:
- Input $ ssh-keygen
- Generate a public/private rsa keypair.
- Enter file in which to save the key (/home-directory/.ssh/id_rsa): [Enter]
- Enter passphrase (empty for no passphrase): passphrase
- Enter same passphrase again: passphrase
- Your identification has been saved in /home-directory/.ssh/id_rsa.
- Your public key has been saved in /home-directory/.ssh/id_rsa.pub.
- The key fingerprint is:
00:00:00:00:00:00:00:00:00:00:00:00:00:00:00:00 username@system
Your Authorized Keys File
Once you have your keypair, you will need to add its public portion to your authorized_keys file.
Get the public key in a format that OpenSSH understands, from your local computer:
- Input $ ssh-keygen -y
- Enter file in which the key is (/home-directory/.ssh/id_rsa): [Enter]
- Enter passphrase: passphrase ssh-rsa some-very-long-string-of-characters= (Copy the whole public key string from ssh-rsa to the final =).
You now need to paste this string into your ~/.ssh/authorized_keys file.
First, try to create your ~/.ssh/ folder. If it is already there you will get an error. This is OK.
- Input $ mkdir ~/.ssh
- mkdir: cannot create directory ‘/home-directory/.ssh’: File exists
- Now, edit your ~/.ssh/authorized_keys file. The easiest way to do this is to:
From ssh.ouac.on.ca:
- Input $ nano ~/.ssh/authorized_keys
- This will open a simple file editor called nano. Make sure that you are on a new line and paste your public key into the file.
- Now save the file with Control-O, then Enter.
- Exit nano with Control-X.
Make sure that your .ssh directory and authorized_keys file have the appropriate permissions:
From ssh.ouac.on.ca:
- Input $ chmod 700 ~/.ssh/
- $ chmod 600 ~/.ssh/*
Try your new keyed authentication from your local computer:
- $ sftp -oPort=52222 username@ssh.ouac.on.ca
- Connect to ssh.ouac.on.ca.
- Enter passphrase for key ‘/home-directory/.ssh/id_rsa’: passphrase sftp>
Using ssh-agent to Handle your Passphrases
For completely non-interactive SSH, activate OpenSSH’s agent program called ssh-agent to handle your passphrases.
Using ssh-agent constitutes a security risk. The severity of this risk depends on the security of the computer on which it resides. It is up to you to weigh the security/convenience trade off and decide whether this is the correct option.
Start ssh-agent, from your local computer:
- Input $ ssh-agent
SSH_AUTH_SOCK=/tmp/ssh-NJjM2664/agent.2664; export SSH_AUTH_SOCK;
SSH_AGENT_PID=2665; export SSH_AGENT_PID;
echo Agent pid 2665;
The commands printed to STDOUT need to be exported as environment variables. The process ID and socket name will be different every time, so must be copied and pasted from your local computer:
- Input $ SSH_AUTH_SOCK=/tmp/ssh-NJjM2664/agent.2664; export SSH_AUTH_SOCK;
- Input $ SSH_AGENT_PID=2665; export SSH_AGENT_PID;
- Add your private key to ssh-agent from your local computer:
- Input $ ssh-add
- Enter passphrase for /home-directory/.ssh/id_rsa: passphrase
- Identity added: /home-directory/.ssh/id_rsa (/home-directory/.ssh/id_rsa)
- After providing ssh-agent with your private key and passphrase once it will not ask for them again until you restart the ssh-agent process.
Try running sftp again from your local computer:
- Input $ sftp -oPort=52222 ssh.ouac.on.ca
- Connect to ssh.ouac.on.ca.
- sftp>
Now you can connect and transfer files without any interaction at all.
To exit ssh-agent:
- Input $ ssh-agent -k
- unset SSH_AUTH_SOCK;
- unset SSH_AGENT_PID;
- echo Agent pid 2665 killed;
Related link: